

How to back up your iPhone
It is safe to say that for most people, their mobile phone is their life. Precious memories, important business material, and contact information to keep connected are all stored on our phones. If we were to lose this information, not only would we be devastated, but it would be a pain to start over again. To save us from this experience, we should ensure that we always back up our data, and so an iPhone backup. In this article, we will provide information on how you can back up data from your iPhone.
Why Backing Up Your iPhone Matters
Before jumping into the methods, it’s important to understand why backing up your iPhone is crucial:
- Data loss prevention: Accidental deletion, hardware failure, or loss of your device won’t mean losing your data.
- Device upgrades: Easily transfer your settings, apps, and content to a new iPhone.
- Security: Backups can be encrypted to protect sensitive information.
How to back up to iTunes
iTunes is an application installed on your PC, laptop, or Mac that can be a great backup utility for your iPhone’s most important memories. Here’s how to do an iTunes backup to get it to back up your iPhone to your computer.
Step 1: Open iTunes on your computer and connect your iPhone to it. If asked for verification, follow the on-screen steps. Ensure that you also unlock your iPhone and trust the connection when prompted.
Step 2: Select your chosen device within iTunes. If iTunes doesn’t appear to recognise your device, follow these Apple help steps.
Step 3: Select Summary from the Settings Menu on the left, if not already highlighted. Under the Backups heading, select This Computer from the backup options. If you want the backup to be encrypted, tick the respective box. If you do, make sure to remember your chosen password and keep it in a safe place for future reference.

Step 4: When ready, click the blue, Back Up Now, button on the right-hand side.
The time it takes will depend on the amount of data.
What’s Stored:
Similar to iCloud, but without relying on internet access or cloud storage limits.
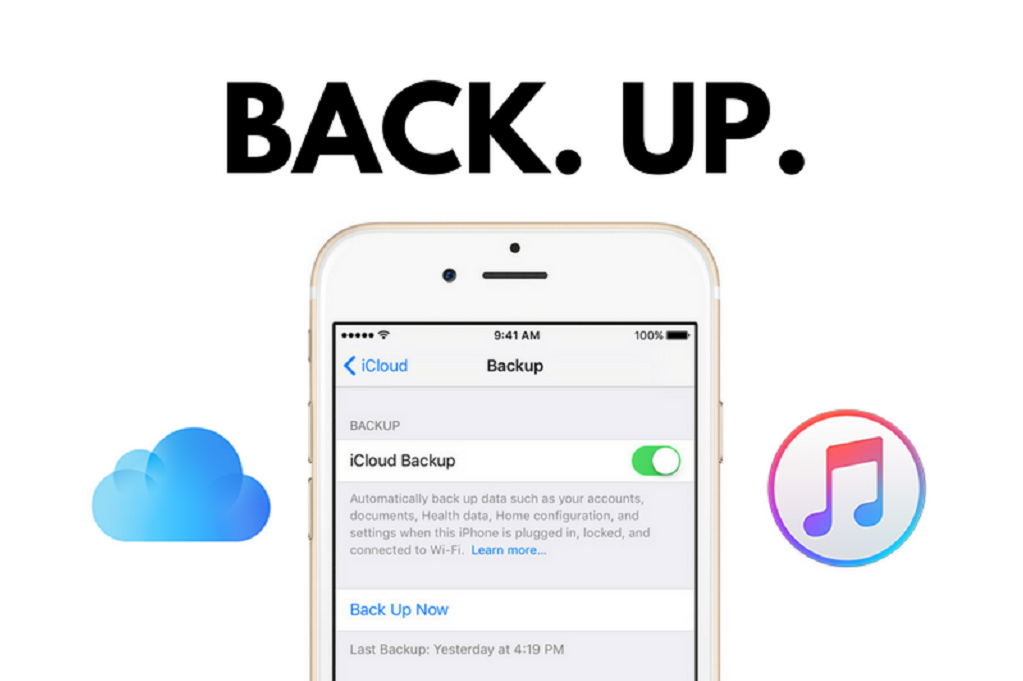
How to back up to iCloud
Apple’s iCloud is a service that can handle backups manually or automatically from your iPhone to the Cloud (a secure server owned by Apple sitting somewhere around the world) without the need for a PC or a Laptop. That means that not only are you protected if your device dies, but if your PC or laptops suddenly dies, then your backup and important data will be safe. There is a downside to using iCloud backup as a backup solution. Apple will provide a free version is currently restricted to a 5GB of data, which is nowhere near big enough to back up most users’ data. You can always opt to upgrade your data allowance to one of three premium storage options for up to 2TB of space for a monthly fee.
Step 1: Tap Settings, and select your name at the top.
Step 2: Tap iCloud. Before you select iCloud Backup, choose from the list of available items what you would like to backup to iCloud. To save space, you may not want to back up Notes, Safari bookmarks and history, Siri and News.

Step 3: Once you’ve done that, select iCloud Backup from the list of options.
Step 4: If you want iCloud to automatically back up your iPhone regularly, toggle the iCloud Backup option under the Backup heading. If you would rather back up manually or just want to trigger another backup right now, tap Back Up Now.
What’s Backed Up:
- App data
- Device settings
- Home screen and app organization
- Photos and videos (if iCloud Photos is enabled)
- Messages, ringtones, and more
Tip: Ensure you have enough iCloud storage. The free tier offers 5GB, which may not be sufficient for most users.
Note: Your phone will only back up when you are connected to a Wifi signal.
Backing Up Using Finder (macOS Catalina and Later)
Best for: Local backup on a Mac without using iTunes
If you’re using macOS Catalina or newer, iTunes has been replaced with Finder for managing iOS devices.
Steps:
- Connect your iPhone to your Mac using a USB cable.
- Open Finder and select your device from the sidebar.
- Under the General tab, select Back up all of the data on your iPhone to this Mac.
- (Optional) Check Encrypt local backup for extra security.
- Click Back Up Now.
Pros:
- Faster restore times
- Option to encrypt and protect your backups with a password
How to Confirm Your Backup Was Successful
To verify your backup:
- In iCloud: Go to Settings > [Your Name] > iCloud > iCloud Backup to view the last backup time.
- In Finder/iTunes: Check the latest backup time listed under the backup options.
Final Thoughts
Backing up your iPhone isn’t just a good habit—it’s essential. Whether you choose iCloud for convenience or a local backup for control and privacy, the key is consistency. Set up your preferred method, and make sure your data is always protected.
No one plans to lose their phone—but now you’ll be ready if it happens.