


Google Chrome is the king of web browsers. However, Chrome has an unfortunate reputation for being very resource-hungry, and there is actually a reason for this. The Chrome browser is built much differently than the other browser,s such as Internet Explorer or Mozilla Firefox. By default, the Chrome browser creates an entirely separate operating system process for every single tab or extra extension you are using. If you have several different tabs open and a variety of third-party extensions installed, you may notice five or more Chrome processes running simultaneously, each using up precious computer resources. In this article, we will explain why Google Chrome has a multi-process architecture and how we can disable Google Chrome multiple processes.

Why Google Chrome Browser Creates Multiple Processes?
Normally, when a Web browser experiences a problem or uses up too much memory, the entire program has to close, which means you lose anything you were working on and all your tabs will shut down. This design is based on the concept of preventing complete browser failure if something goes wrong. For example, if you open a website on your Chrome browser, then this website will remain active and will be accessible in its own tab, even if you open multiple other websites and one of them turns out to be slow or crashes. By separating out each tab and extension into a separate process, the browser can remain active even if a single tab has to close. Using multiple processes also results in faster surfing speeds as computer memory is allocated only to the currently open tab.
You can change this configuration of Google chrome so that it does not open a new process for each tab that is opened, or you can keep it as is and have the ability to close individual processes.
Solution 1: Changing Configuration
You can limit the Chrome processes to one by changing the configuration with a few simple steps.
- Right-click on the “Chrome.exe” shortcut on the desktop and select “Properties“.Clicking on Properties Note: If you don’t have a shortcut, create one.

- Click on the “Shortcut” tab on the top and select the “Target” option.
- Add the following command line at the end of the listed target location.–process-per-site
- After adding the command line, the full entry in the target panel should look like the following.”C:\Program Files (x86)\Google\Chrome\Application\chrome.exe” –process-per-site
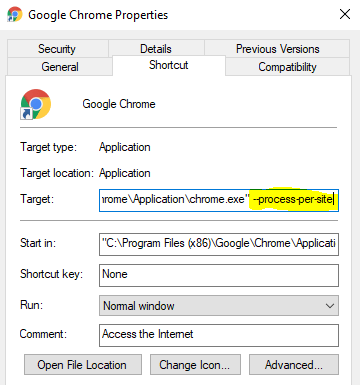
- Click on “Apply” and then select “Save“.
- Now Chrome should be running a single process for all the tabs.
Solution 2 – Manually close the processes
Use the built in Chrome Task Manager
You may be familiar with the Windows Task Manager, but did you know that the Google Chrome Web browser has its own built-in task manager window that lists each process currently running. Using Google Chrome’s built-in task manager will allow you to view exactly which page is freezing, and you can then end the process behind that page only. If you need to see each process Google Chrome is using, access the Chrome task manager by clicking the wrench icon in the upper-right corner of the screen, selecting “More Tools” and then clicking “Task Manager.” Or you can press Shift + Esc, and this will also open the Chrome Task Manager
Use the Windows Task Manager
Because all the Google Chrome tabs currently open have their own separate process, each of the processes will appear in your operating system’s task manager window. Press the “Ctrl,” “Alt” and “Delete” keys together and click the “Task Manager” button to access a window that will show all programs and processes running on your machine. Select the “More Details” button and scroll down to “Google Chrome” to find the multiple active Chrome processes. Click the process you want to close and choose “End Process.”
Modify Chrome Shortcut with a Command Line Switch
You can limit Chrome’s multi-process behavior by adding a parameter to its shortcut:
- Right-click on your Chrome shortcut and choose Properties.
- In the Target field, add the following at the end after the quotes:
--process-per-siteThe full line should look something like:"C:\Program Files\Google\Chrome\Application\chrome.exe" --process-per-site - Click Apply, then OK.
- Restart Chrome using this shortcut.
What This Does:
The --process-per-site switch tells Chrome to use a single process per site (not per tab), reducing the number of processes and memory consumption.
Disable Extensions and Plugins
Many Chrome extensions run their own processes. Disabling or removing unused extensions can significantly cut down on CPU and RAM usage.
To manage extensions:
- Open Chrome.
- Type
chrome://extensions/in the address bar. - Disable or remove any extensions you don’t need.
This not only improves performance but also enhances browser security.
Use Chrome Flags (Advanced Users)
Chrome Flags offer experimental features and controls for advanced users. While not always stable, they can provide more customization.
- Type
chrome://flags/in the address bar. - Search for “Site Isolation”.
- Disable Strict Site Isolation if it’s enabled.
- Restart Chrome.
Note: Disabling site isolation may reduce browser security. Only proceed if you’re aware of the implications.
Monitor Background Processes
Chrome may continue running in the background even after all windows are closed. This can be disabled:
- Click the three-dot menu in Chrome.
- Go to Settings > System.
- Toggle off Continue running background apps when Google Chrome is closed.
Final Thoughts
While Google Chrome’s multi-process design offers performance and security benefits, it’s not ideal for everyone—especially those on lower-end systems. By learning how to disable multiple processes in Google Chrome, you can reduce memory usage and enjoy a faster, more responsive computer.
Make sure to strike a balance between performance and stability. Completely disabling Chrome’s multi-process feature is not recommended, but tweaking it for efficiency can make a big difference.